User Interface
Several of the mods in this pack add things to the Minecraft UI, and these are some of the most important mods to be familiar with.
The One Probe
The probe displays infomation about the block you are currently looking at in the world, which can be very helpful when you find unfamiliar modded blocks. By default it’s always displayed on screen showing basic information:

- The block name and mod name are straightforward. Pretty much anywhere in the UI where text appears in blue italics, this is a mod name - the same formatting is used in item tooltips.
- The tool name in green indicates the type of tool which should be used to quickly mine this block. It will say “No tool” if there is no tool type that is specifically good for mining this block.
- The tick/cross next to the tool name indicates whether or not the tool you are currently holding in your hand will cause this block to drop or not: for example, if you are holding a stone pickaxe and looking at a block of diamond ore, it will turn into a cross to indicate that even though you can break the block with this tool, it will not drop the diamond ore.
Additional information will be shown when looking at certain vanilla and modded machines and similar blocks: for example, the current processing progress, or power level, or fluid tank level.
You can see even more detailed information about blocks by crafting a probe (see the section on JEI for how to find the crafting recipe) and holding it. This will show the contents of containers and other extended information. You don’t need to make the probe to see the basic information shown above.
JourneyMap
JourneyMap maps the world as you explore, and can display both a full-screen map view and a minimap. It also allows you to set waypoints, and will set a waypoint automatically when you die so that you can find your gravestone to retrieve your items.
The minimap is enabled by default in the top right corner of the screen:
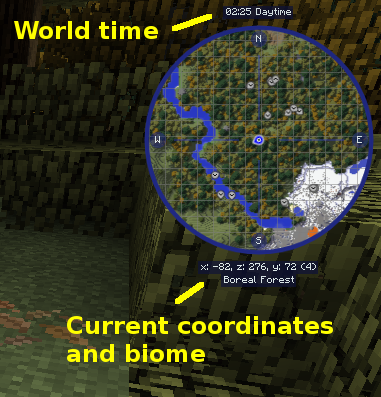
- In the world time, 00:00 is sunrise, 06:00 is noon, and 12:00 is sunset, because for some reason Minecraft’s clock starts at sunrise.
- Red dots on the minimap indicate hostile mobs; grey dots are passive mobs (animals).
- Other players will be shown on the map, but only when they are nearby.
- You can set a waypoint at your current location by pressing “B”.
- You can zoom the minimap in and out with “=” and “-“.
To see the full-screen map, press “J”. Note that this does not pause the game, even in single-player mode. In the full-screen map you can use the mouse to look around the map and customise the view, as well as access the list of waypoints to edit or delete them, and change JourneyMap’s settings.
JourneyMap will only ever show you parts of the world you have visited, and the map will only reflect what was in that part of the world when you were last there: if the world has changed, the map will not update until you visit that location again.
Note that the map data and waypoints are saved locally on your computer, not on the server.
Just Enough Items (JEI)
JEI appears on the right hand side of the screen any time you open your inventory. It lists every item available in the game, both vanilla and modded, and can show you all the crafting recipes for the item. The basic list looks like this:

- You can left-click on any item to see all the recipes which produce that item, and you can right-click to see all the recipes which use that item as an ingredient.
- You can use the search box at the bottom of the screen to search for an item by name. You can also search by mod name by prefixing it with an “@” sign - this is very useful to get an overview of what a mod provides. For example, try searching for “@thermal” to see all the items added by the Thermal family of mods.
- You can also press “R” while pointing the mouse cursor at an item in your inventory to see the recipes to make that item, and “U” to see the recipes that use that item, without having to look it up in the JEI list first.
The JEI interface for showing recipes:
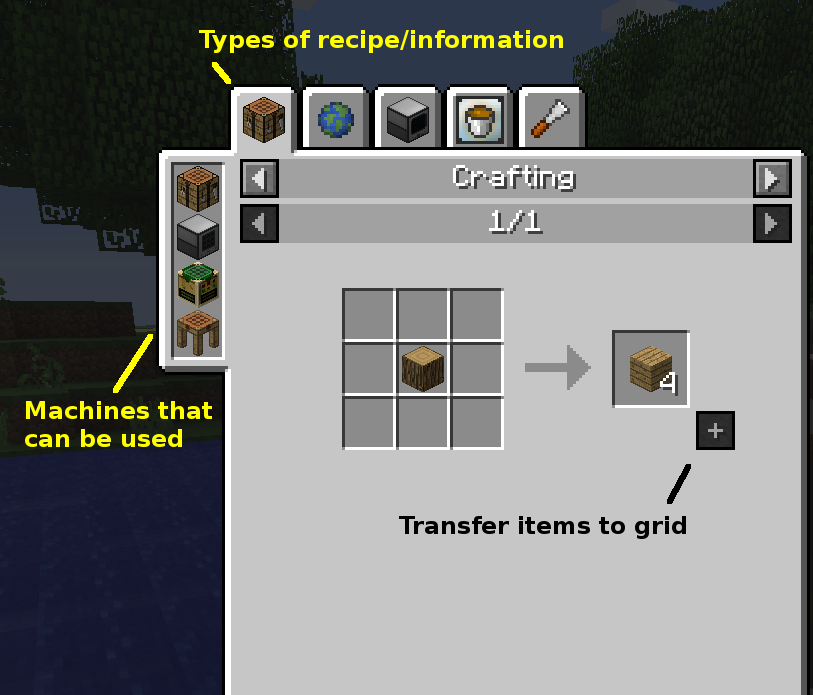
- The tabs along the top of the dialog show the different types of recipe (or in some cases, non-recipe information about the item) which can be viewed. You can hover the mouse over each tab to see what the type of recipe is called and which mod defines it.
- The tab on the left side of the dialog shows which machines can be used to craft this recipe.
- You can left or right click on any item shown in the recipe dialog to see the recipes for that item, to follow a sequence of crafting steps.
- Some recipes have ingredients that accept more than one type of item (for example, most items made of wood will accept any type of wood): this will be shown by the dialog cycling through all the possible ingredients in turn.
- If you have the items required to craft a recipe, and you had the right type of machine’s UI open (e.g. if you right clicked a crafting table before opening the recipe UI, for normal crafting recipes), then the “plus” button on the bottom right of the recipe will be enabled. You can click on this button to automatically transfer the ingredients to the crafting grid in the correct pattern. You can also shift-click the button to transfer as many sets of the ingredients as you have, to craft multiple items at once.
AppleSkin
AppleSkin adds a display of your saturation level to the hunger bar:

The golden border on the drumsticks indicate your saturation level; the drumsticks continue to indicate your hunger level as normal. For more information about the difference between hunger and saturation, see the Minecraft wiki.
AppleSkin also adds the amount of hunger and saturation that food items restore to their tooltip, so you can see how effective different foods are.